Creating an Architecture Form Diagram - The Easiest Way
Hang with us on the podcast: http://successfularchistudent.com/category/the-successful-archi-students-podcast/
Join the community! http://successfularchistudent.com/community/
How to create an architectural diagram that shows your concept’s form development.
This is the easiest way to create an architecture operational form diagram using Rhinoceros 3D, Adobe Photoshop and Illustrator.
I hope you enjoy the video! Feel free to discuss anything in the comments below. I respond to every comment 🙂
The Quickest Way to Create an Architecture Form Diagram
How do I quickly create a diagram to showcase my concept form development?

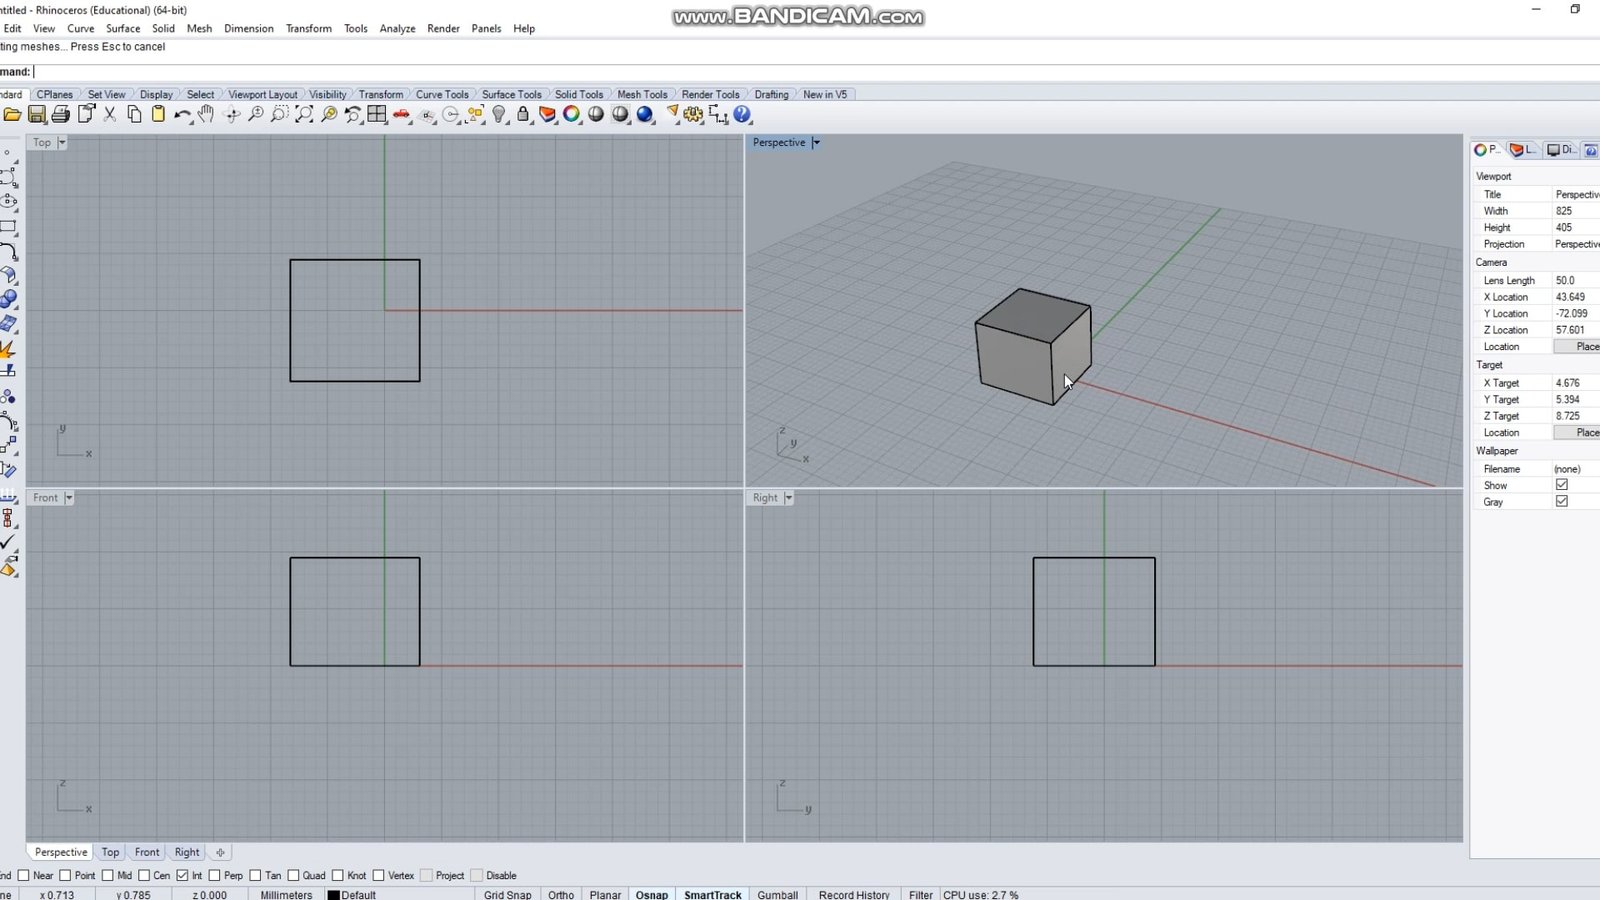
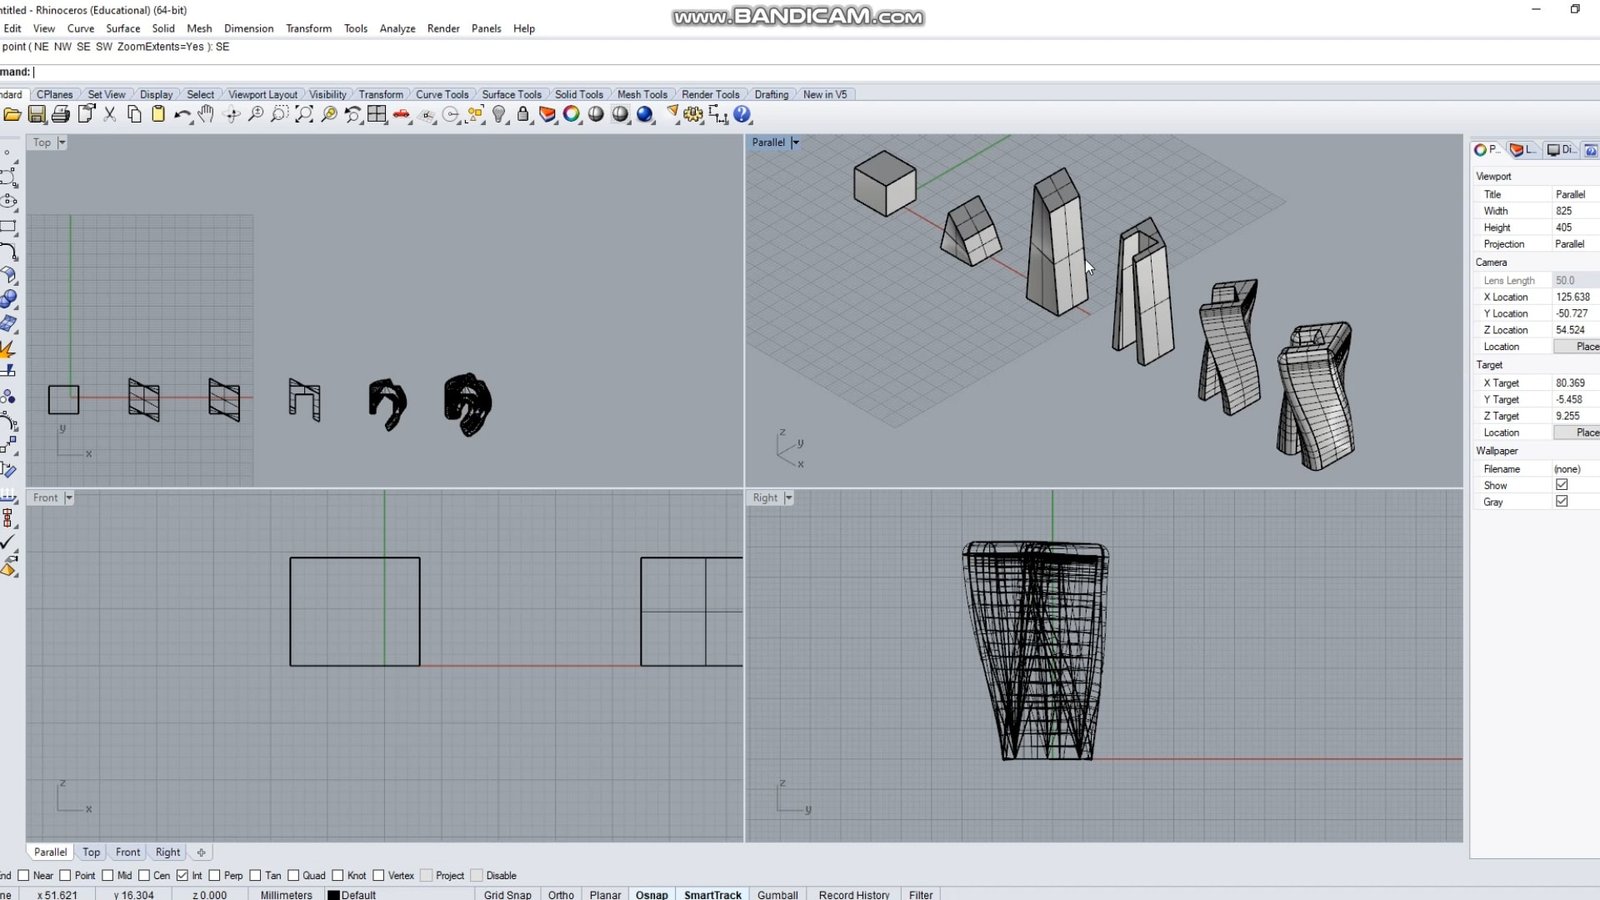
Firstly, open up Rhinoceros 3D. You want to create an initial form that is simple and easy to manipulate.
In this case, I start by creating a cube geometry. You can use the Cube tool or type “Cube” into the command prompt.
Next, make a copy of the cube using the “Copy” command and paste it on a parallel line to the original cube.
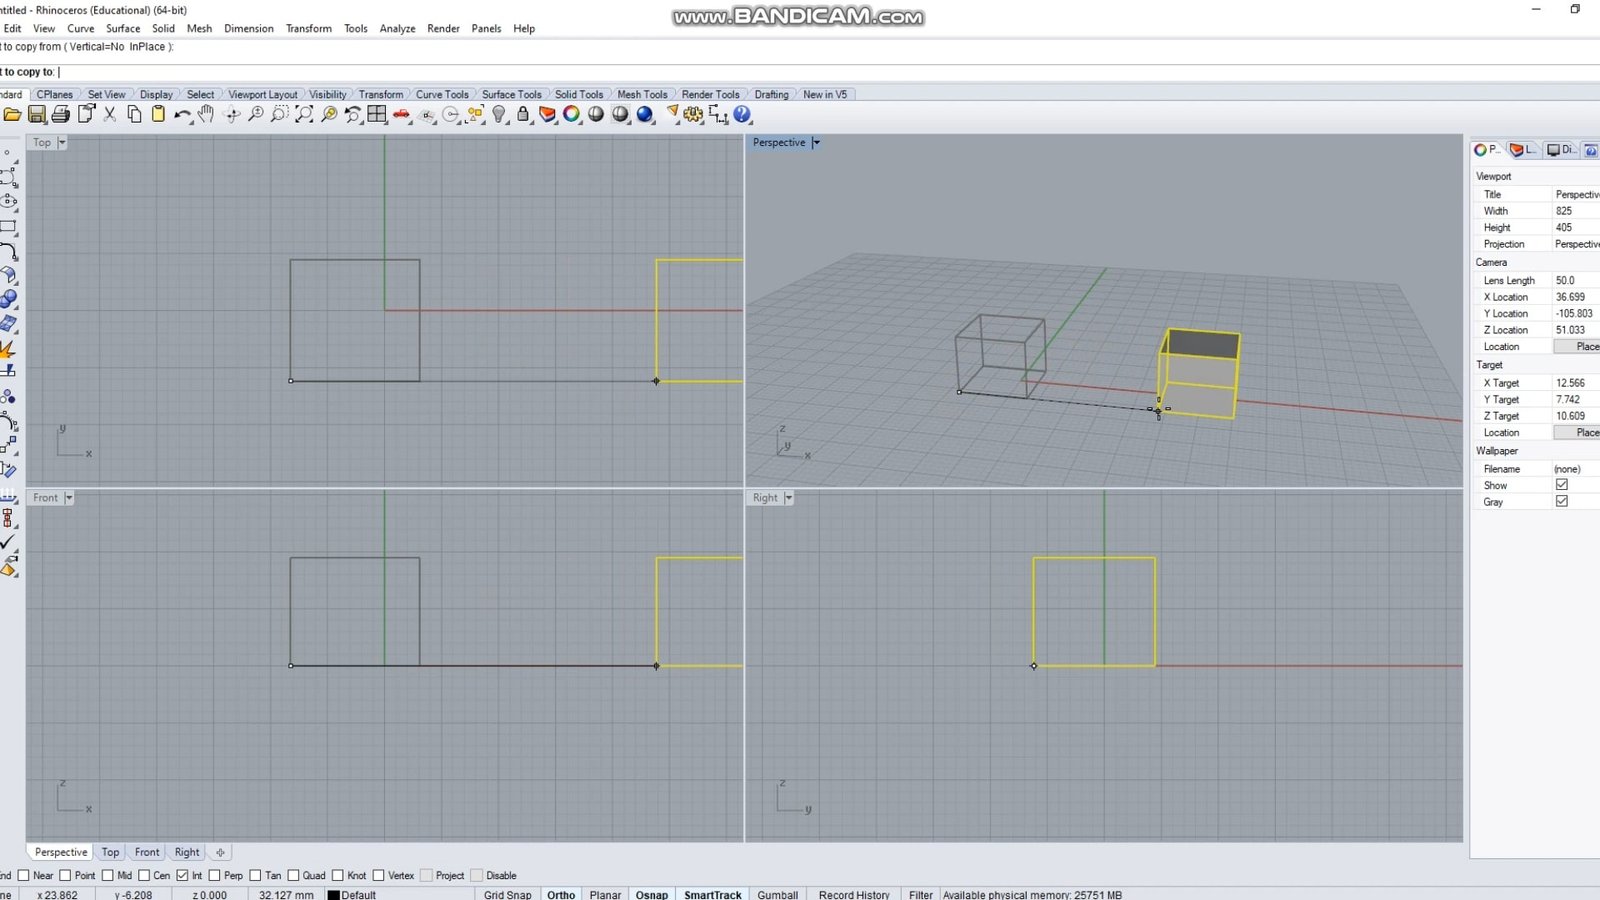
This duplicate can be morphed and distorted multiple times in progressions.
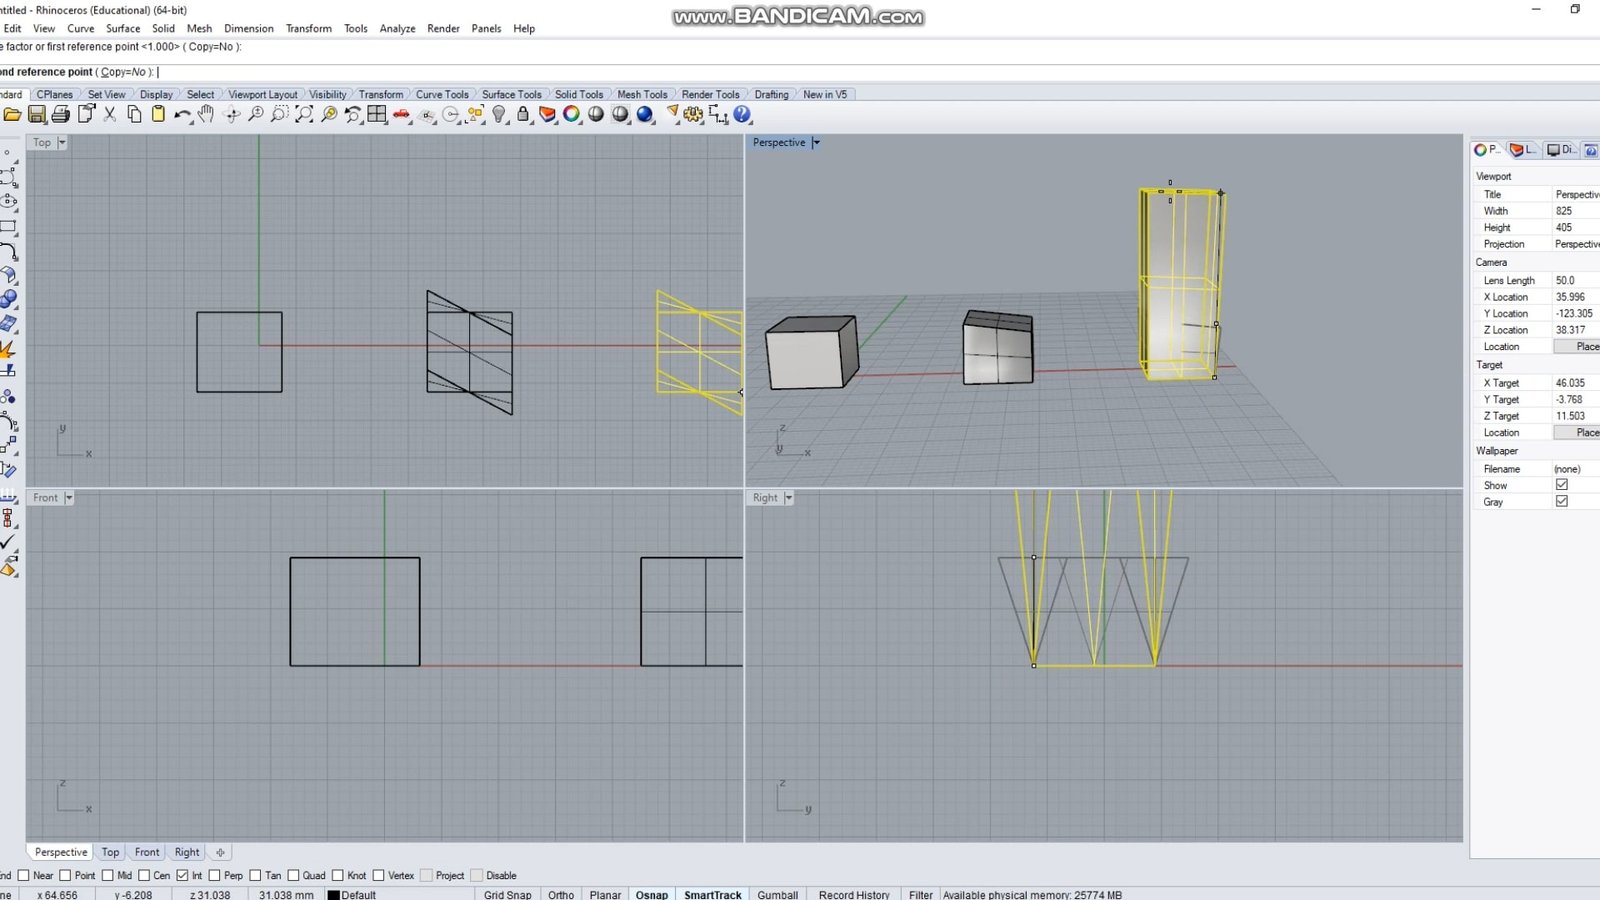
Each time you make a change to the previous form, copy it and paste it the same distance away as the previous form.
Once you are happy with how your form development looks, the next step is to set your perspective view port to Isometric.
You can do this by either pressing the viewport drop down and pressing “Set View” -> “Isometric“
Or by typing “Isometric” in the command prompt.
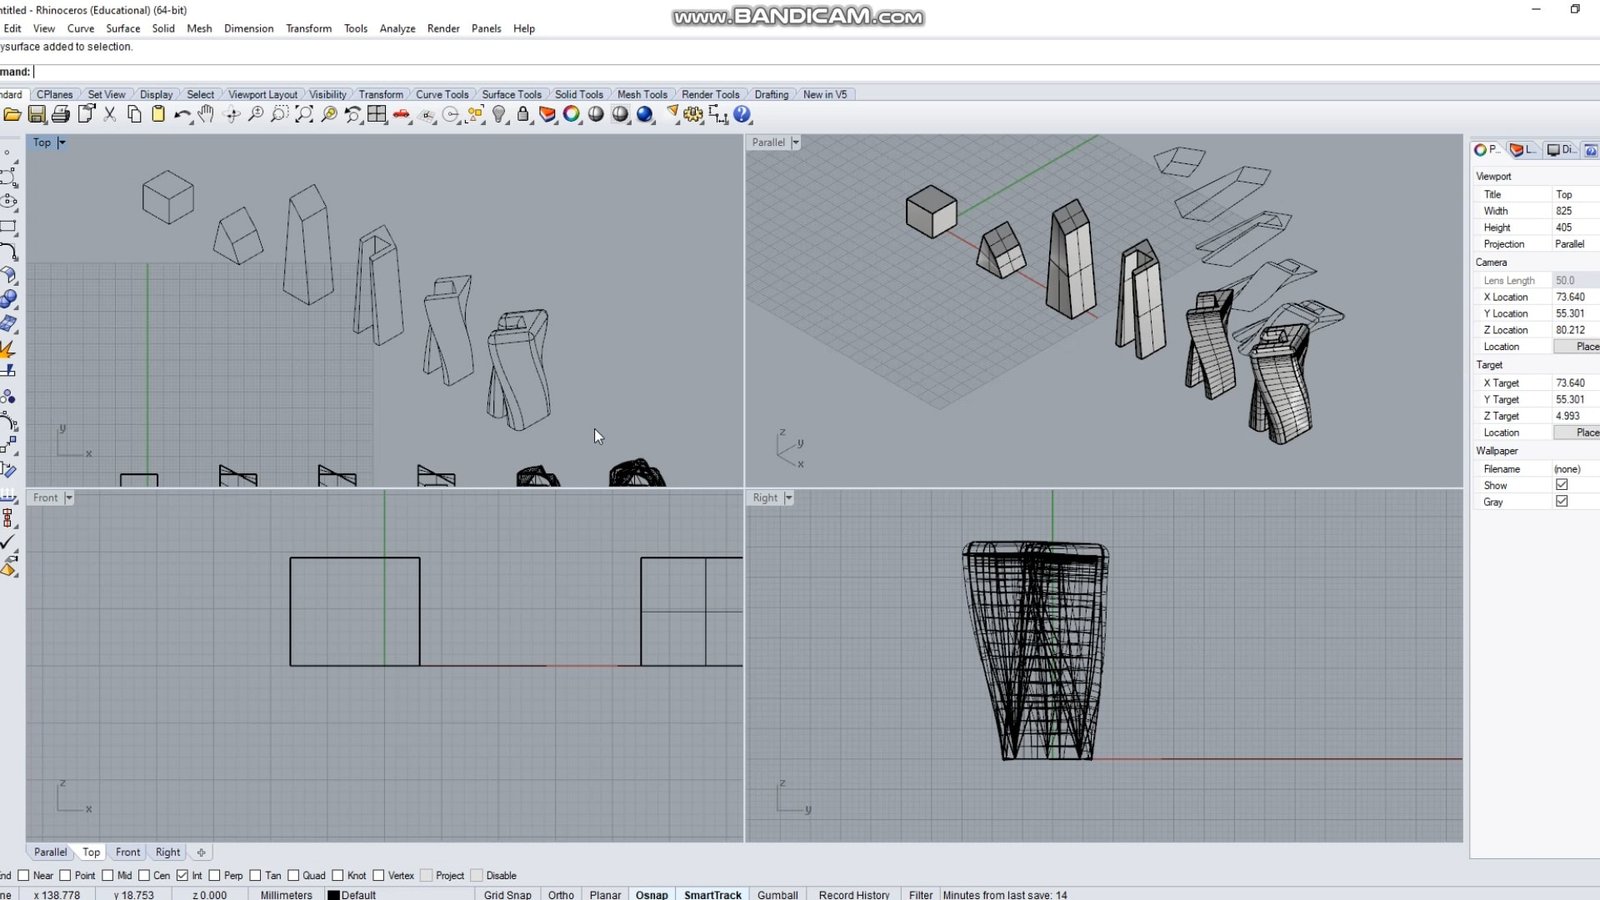
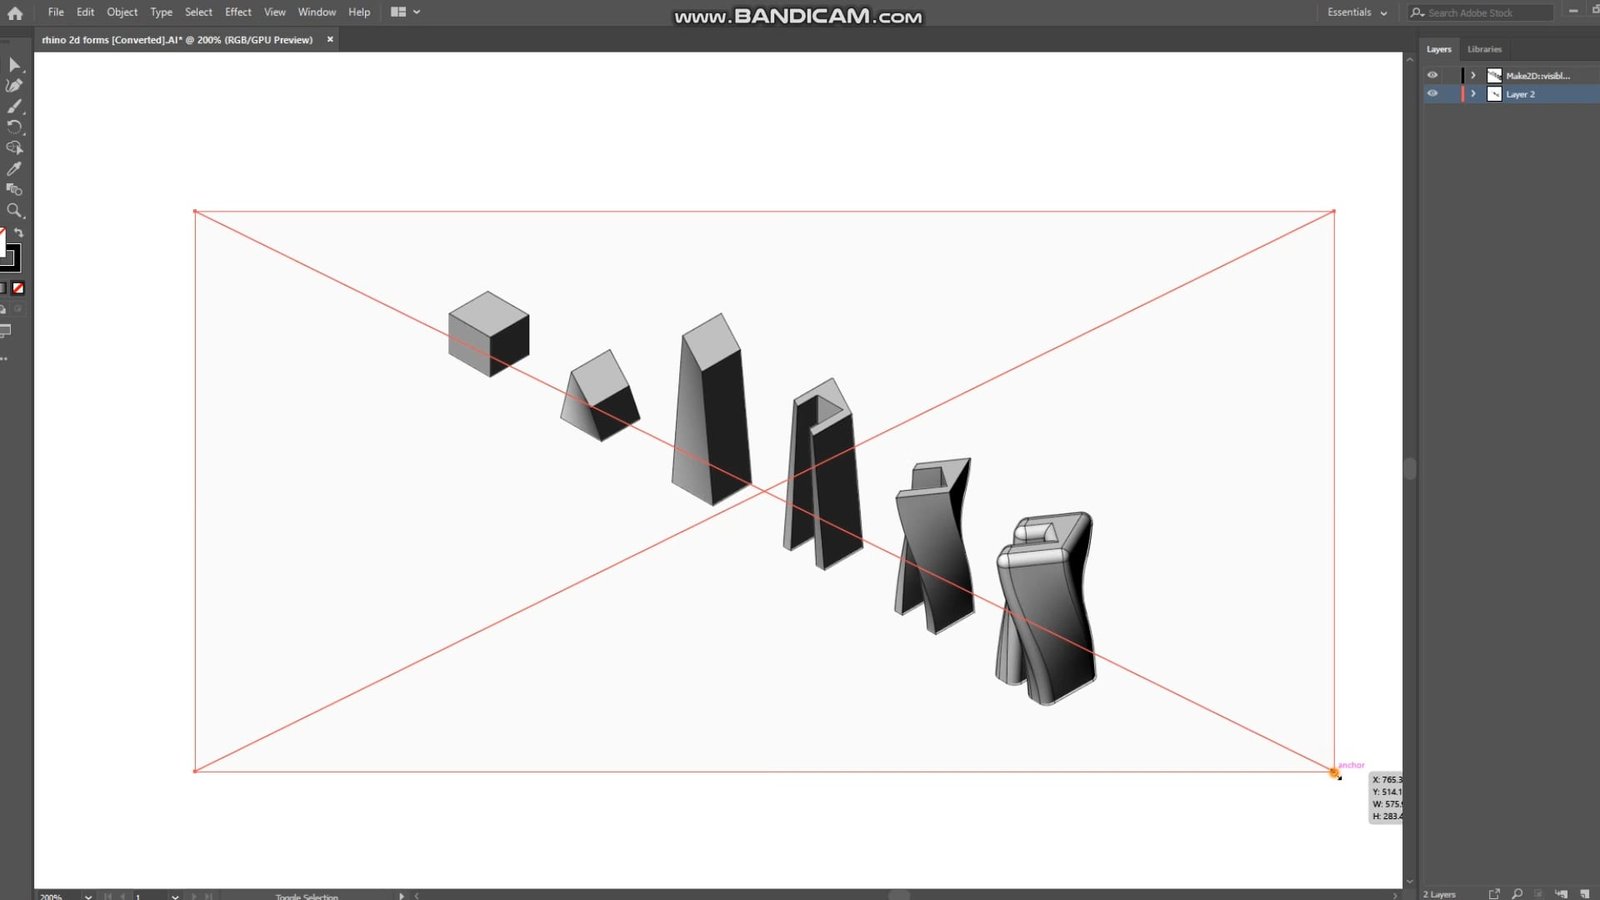
Next, you can select your forms in the Parallel view port and use the command “Make2D” to flatten them in the Top view port.
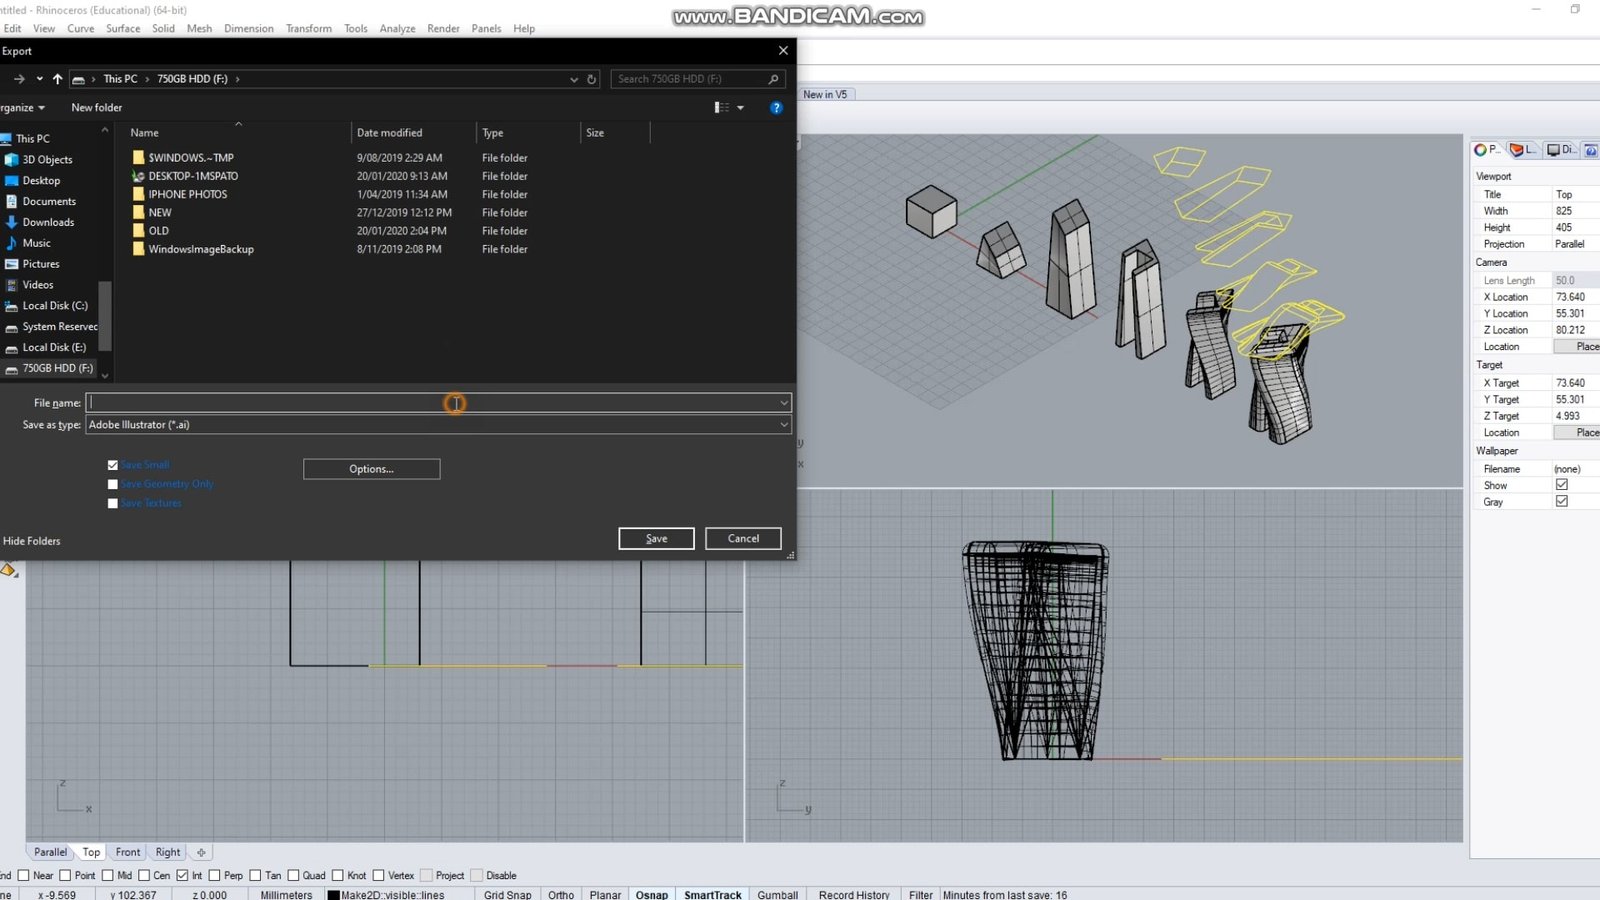
From here, select the 2D forms in the top view and use the command “Export” to export it to an Adobe Illustator (.ai) file.
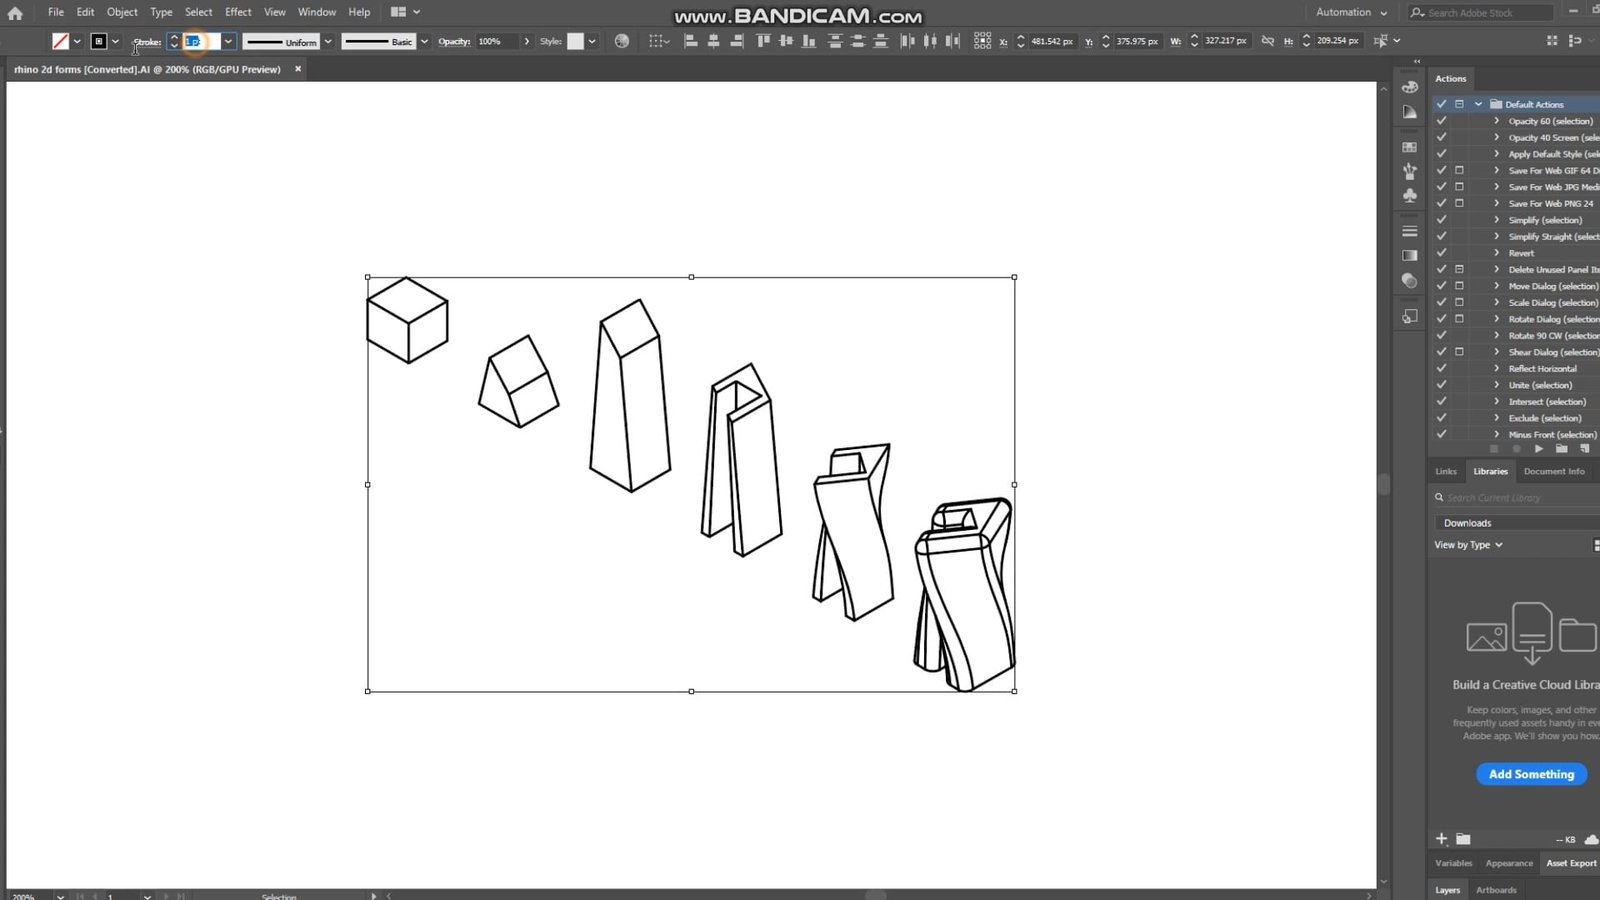
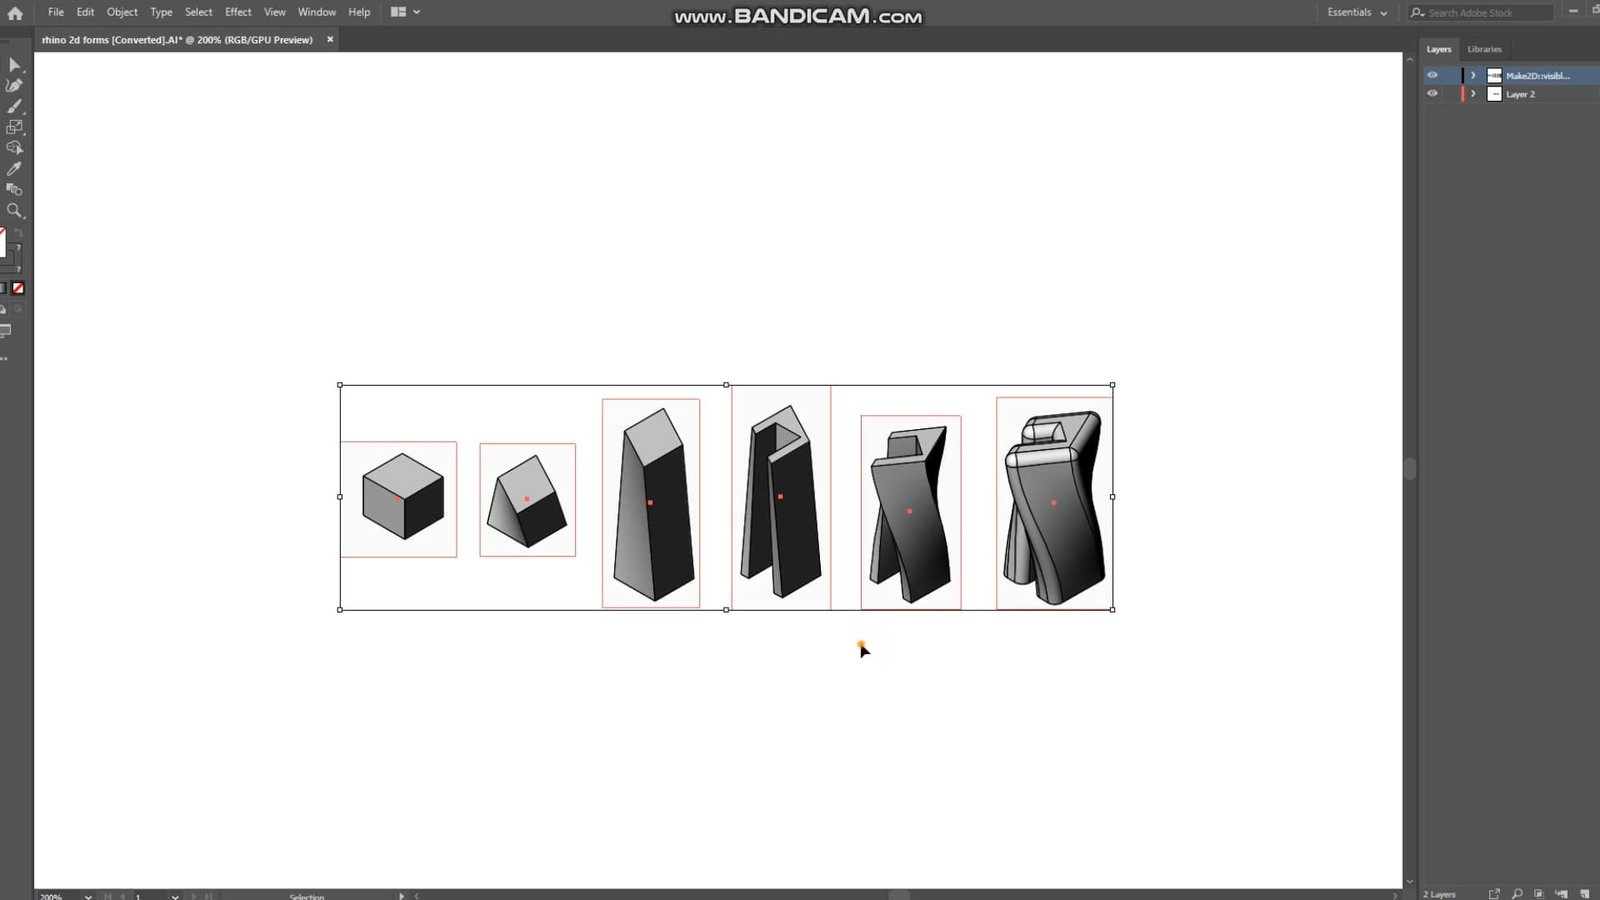
Open the Adobe Illustrator file you just exported and manipulate the stroke thickness of the lines.
We can now start adding shadows to the linework.
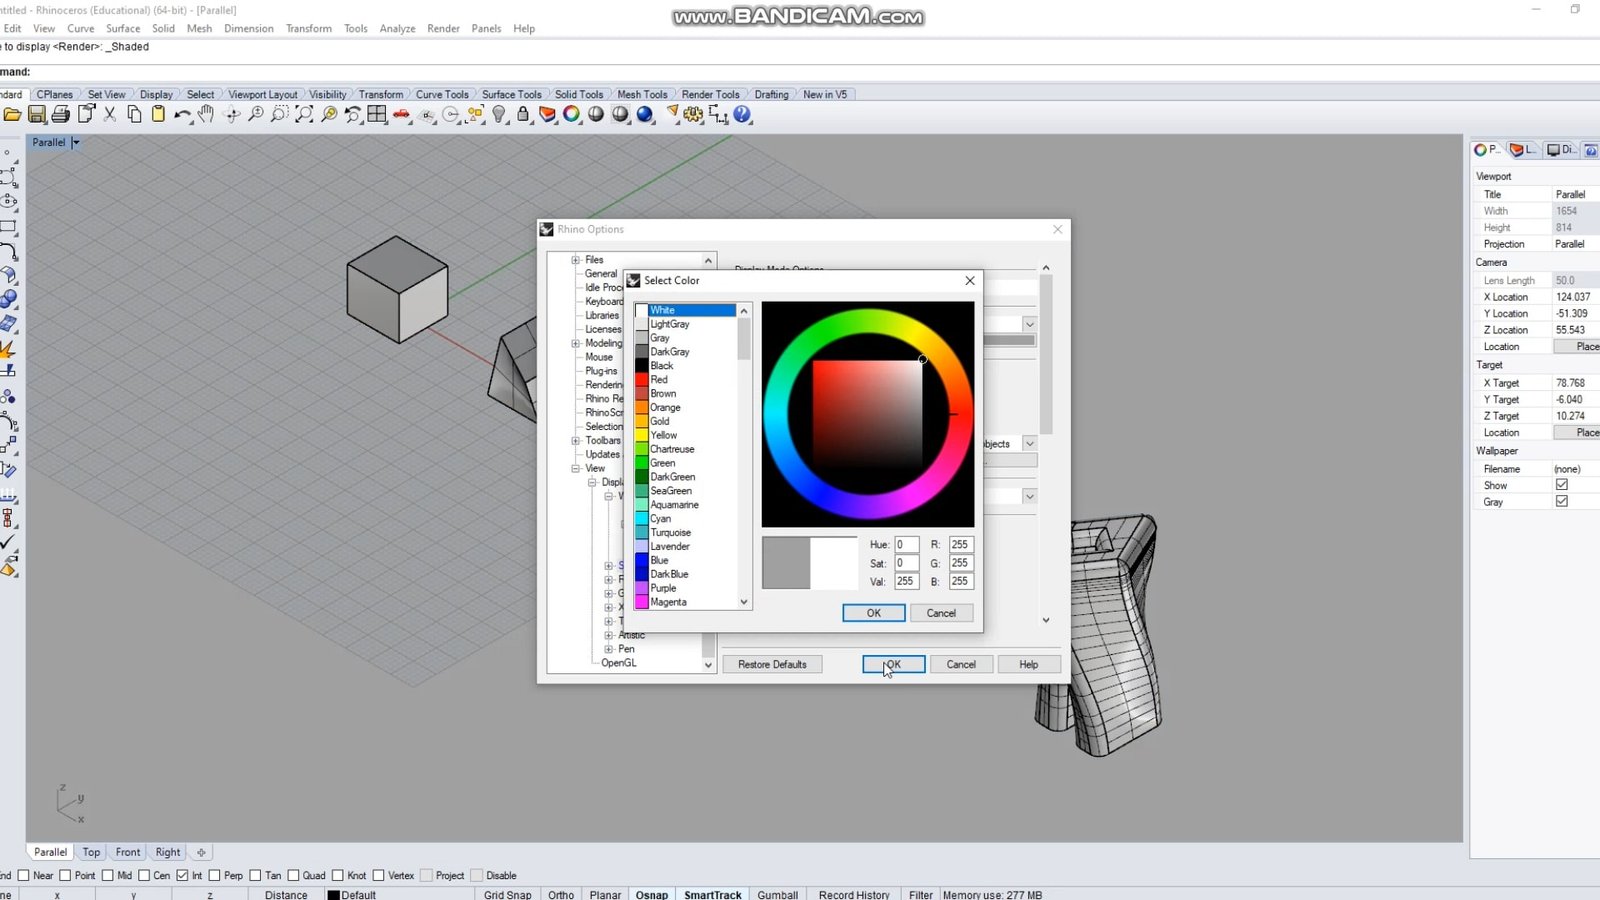
Back in Rhino, in the view port settings, change the display background to white.
Go to the Perspective viewport settings -> “Display Options” -> and change the background colour to white.
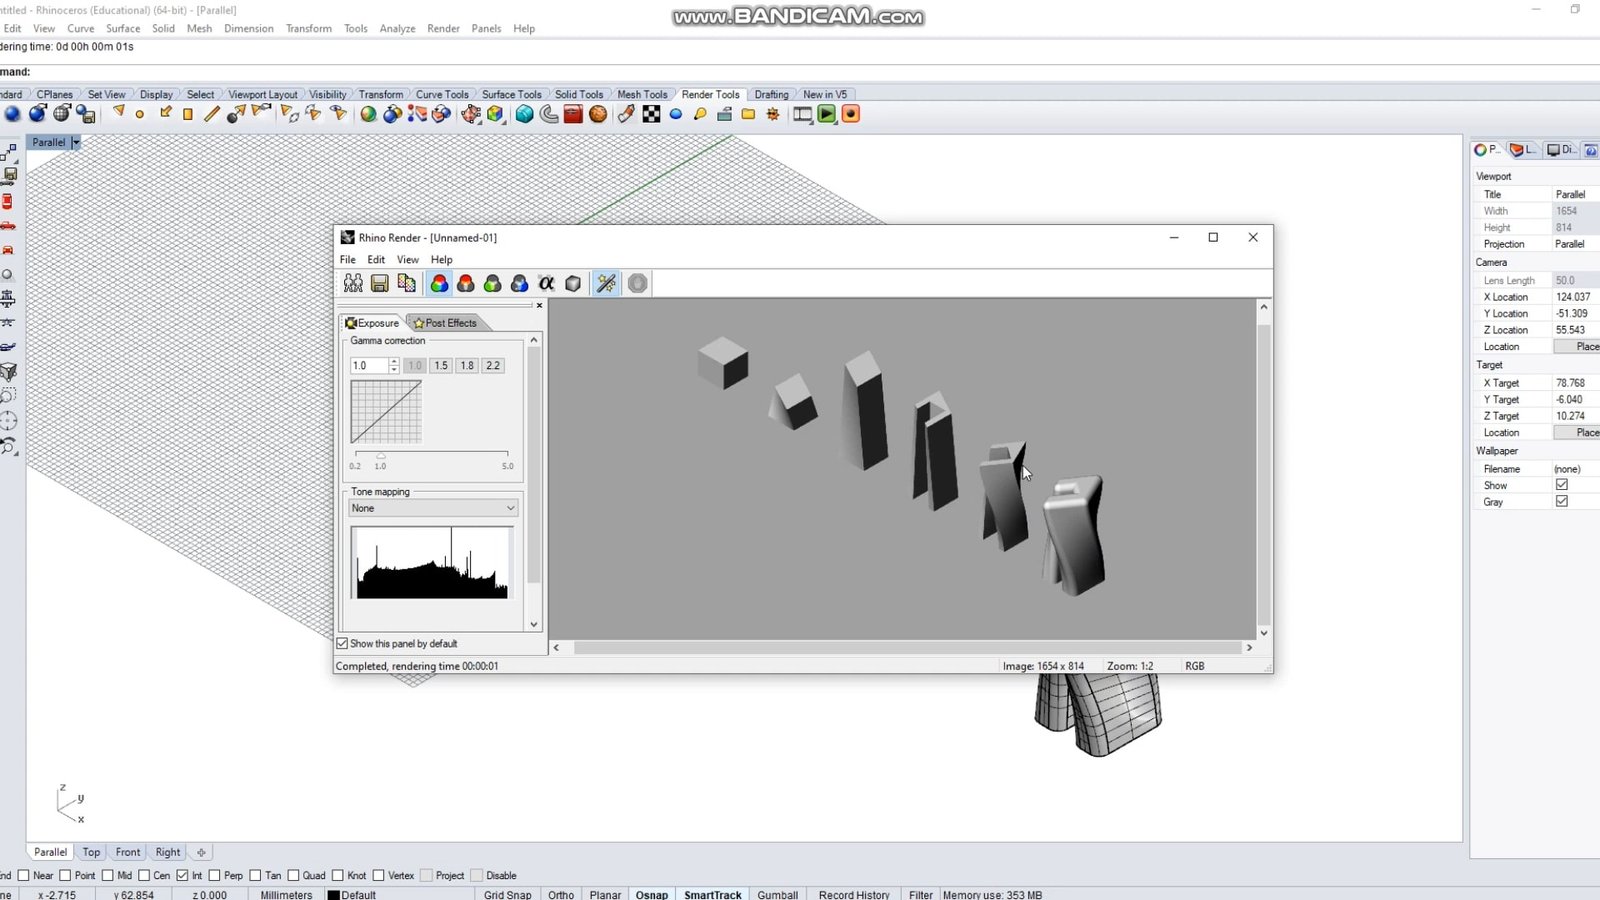
Render your perspective view in high resolution and high quality.
Back to Illustrator.
Create a new layer. Add this render to your Adobe Illustrator file and scale it appropriately so that it sits nicely behind the existing line work.
Copy this image of the shadow renders using Ctrl + C or Cmd + C.
“Paste in Place” (Shift + Ctrl + V) 5 times. (or as many times to how many forms you created”.
This will create 6 images of the shadow work.
Next, use the Rectangle Tool (M) to create a box around the first form.
Using the selection tool, hold shift and left click on the background render (shadow image) to select both the line work and shadow.
Use Ctrl + 7 to Clip the mask you created.
Do this for each form you have.
This will allow you to line your forms up in a row.

I will leave the rest up to you! How you want to colour it, annotate it or showcase it is completely up to your own creativity from here.
You can use text, arrows, colour and different graphics to showcase your form development.
I hope you found this guide useful 🙂
DO YOU HAVE A QUESTION YOU WANT ANSWERED?
If you have a question you want answered or discussed, feel free to post it on the forums so I can see it!
The Best Community of Architecture Students
Other students might even join in on the discussion and answer it for you.
If not, I’ll answer it on the next Q&A episode of the podcast!
Resources Mentioned
Hang with us on the podcast: http://successfularchistudent.com/category/the-successful-archi-students-podcast/
Ask a question/join the community: http://successfularchistudent.com/community/get-help/
How to Create An Architectural Form Diagram For Your Projects
If you prefer reading, this is the video transcript of the video “How to Create an Architecture Form Diagram – Architectural Diagram Tutorial“
Hey guys, welcome to Successful Archi Student.
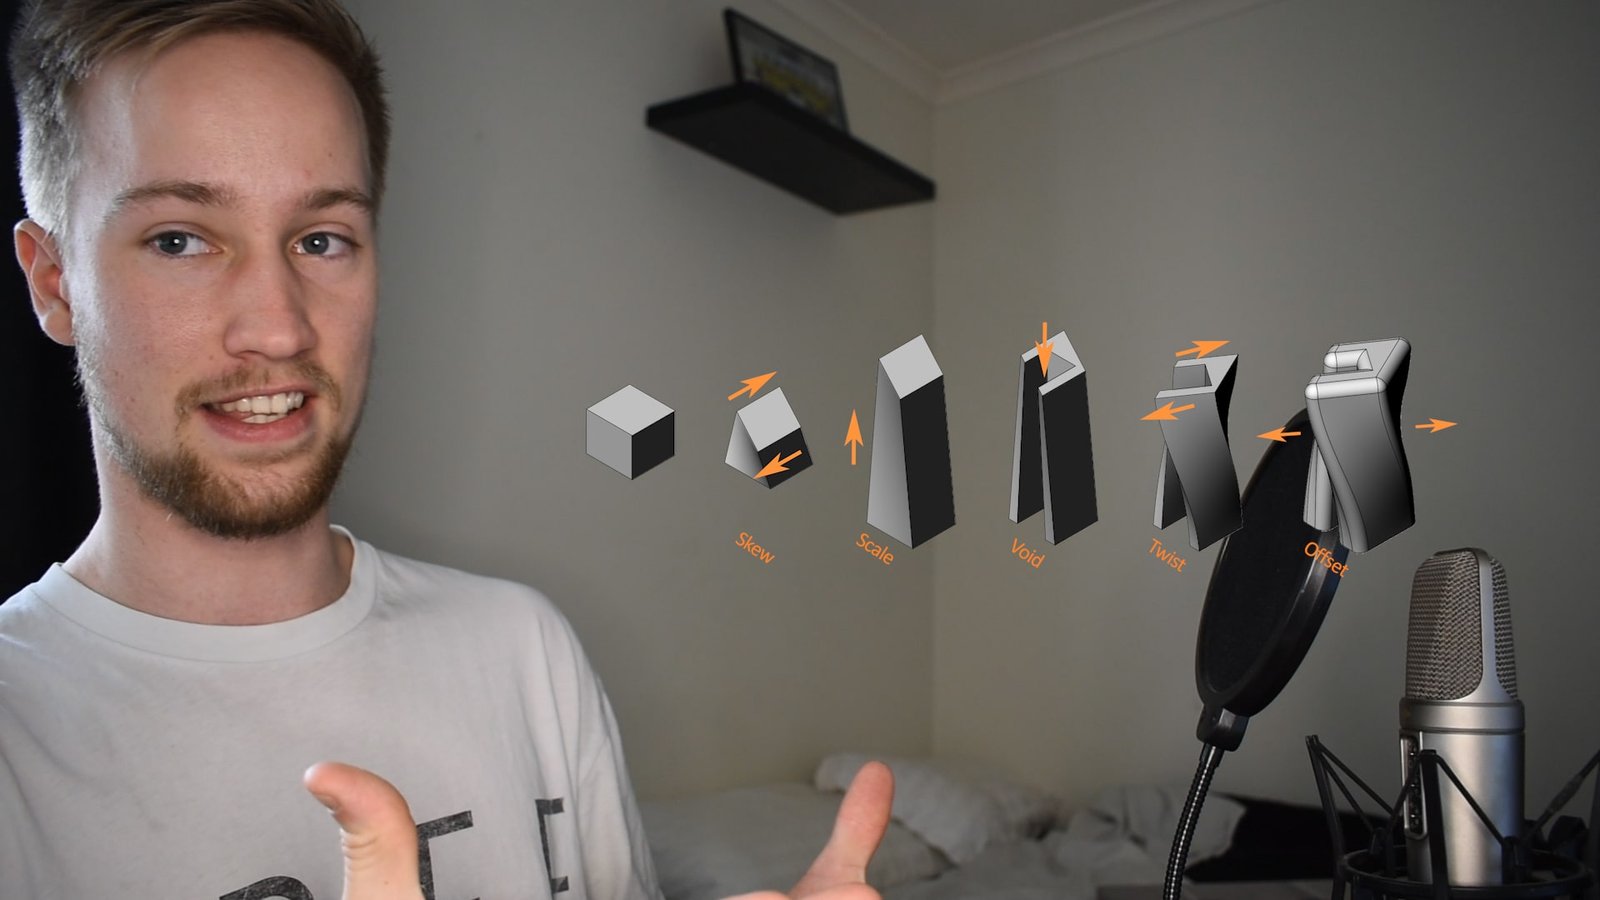
So today I want to show you something pretty cool. This is going to be a tutorial or a guide, I guess just a walk through of how to create a operational diagram that’s going to be something like this just on the screen here. And it’s going to be really helpful for showcasing the development of your design form, and also, in showcasing and explaining your design process and decision. So without further ado, let’s get straight into this video.
I’m going to start off by creating a cube. And we’re going to start with this cube as your form. To create a cube, just use the cube tool right here, we’re in Rhino 5.0. This isn’t the newest version, but this is the version I’m using. So we’ve created a cube, we’re going to set the view port to shaded mode.
So from here, this is pretty much the first step of this operational diagram. And so what we want to do here now is just copy this one over by highlighting it and typing copy. I’m just gonna grab the point of it and just bring it out a certain distance. Probably about that much, just so it’s a bit of bit of breathing room from the other one. And so from here, all we want to do is just start making changes and showcase how this form is going from a cube into something else. I’m thinking kind of like a skyscraper looking tower thing that twists around, and I’m going to show you how I get from this cube form to that final design. So now we’ve copied over this cube, we’re going to make just one, one adjustment to it, we’re going to explode it. So we’ve got all the faces of it. And we’re going to turn the points on by typing p o n. And then I’m just gonna grab these two corners here, I’m just gonna kind of go to the top view, I’m just gonna move them out a little bit. holding Shift and it’s gonna push him out a bit. Want to do it again with this with these two corners at the top here. It’s gonna push him out today kind of twist around a little bit, something like that.
So then once we’ve created this form, we can just copy this one over again but highlighting it Oh, we got to get out to him by pressing a scale Highlighted Oh, press Oh type copy. And I’m going to grab it and move it the same distance as the other one. So now we’ve got three forms here, which we are developing. So in this form here, I’m just going to, I think I might just want to scale it up. So I’m just gonna grab from the right view, I’m just going to go directly up and scale this bad boy up into like a tower looking thing. It’s now got this twisting tower, I’m just going to copy that one over again, by typing copy moving at the same distance. And you don’t have to copy the same form, you can do this for any kind of form. I’m just going to show you the process of it.
So now that we’ve got this fourth diagram, but I’m going to actually join all those planes together. So then we’re just got one form, and in the top view, I’m going to, I’m thinking I want to have a little void running through the building. So I’m going to grab another cube. I’m going to go from here to here and just create this cube that goes all the way through it like that. What we can do from here We can click on the original form, we can type Boolean difference. I said that really Europeanly , that was weird. And then we’re just going to hit on the other object there and press enter and that’s going to remove that form from it. So as you can see, we’ve got this twisting tower thing the void through the middle.
From here I’m thinking I’m going to copy this one over again, using the same processes before and I’m thinking about what a twist this one around, so I’m just going to use the command twist. And I’m going to bring that up. And let’s just twist it from there, or it looks a little bit funky. So put a little bit of a twist in it might actually do a little bit more than that. There we go. Got this little twisting tower gonna just add one more step to it because now we’ve got five steps so far.
I’m going to add one more by just copying it one more time is the same process. And then I’m going to offset this surface offset SRF on a use a distance of two units. And I’m just going to bring that out. Now it’s got a bit of a curved and bit of a thickness to it. mostly going to delete the bottom of this by exploding it and then get rid of that. So it’s a flat bottom.
There we go now with this process of getting from a cube, by twisting it, and we’re, we’re morphing into this kind of shape by creating voids and twisting it again and extruding it. And then we’ve come up with this kind-of tower looking concept for design.
Once you’re happy with your design process and how your forms evolved into this tower or whatever you’re creating, then we’re just going to go to the view port settings at the top here, click on the down arrow and go to set view. In Rhino six, this will have an isometric option. In Rhino five. That’s what we’re using. We’re going to actually have to type in isometric. So if we type in isometric into the command prompt, we want to South East isometric look. So that gives us southeastern isometric view that we can now put into Illustrator and we can start adding some shadows and stuff to this and then morphing it using Adobe Illustrator.
If you’re ready to put these into Adobe Illustrator, all you have to do is highlight all of them and type make 2d into the command prompt. The settings are all right or all okay. The I think this show him lines option is usually by default, but you can just take that and click OK and the steel to put a view into our top viewport.
Sometimes when you use the make 2d command, your forms will be missing lines, right now they look pretty well okay, there’s not really anything missing, what you can do is go to the Tools menu bar at the top here. And then you can just go options. And if you click on units, you can change this absolute tolerance, I think differently, it’s 0.1. And you can just add a couple of zeros to that and they’ll make it a lot better. So once you’re happy with your 2d form, what you can do is highlight all of that and we can type export that way we can now export it into him. Adobe Illustrator file. So I, I, you can put this wherever you like, I’m just going to save it in here and type rhino 2d forms. Say that we want a snapshot of the current view, it doesn’t matter what the scale is because we’re putting it into Adobe Illustrator, which is a vector based program. So we can resize it, as we wish, besides these forms are to scale anyway, so it’s not going to be big deal. And we’re just gonna go ahead and press OK. And that exports our 2d files into Adobe Illustrator.
Once we’re done that, we can go ahead and find our files. So my images here and rhyno 2d forms. I’m just going to go ahead and double click on that. And so there we have, these are our 2d forms that we’ve just exported into Adobe Illustrator and we can start to manipulate this to look a little bit better. These might look a little bit thick, all you have to do to change it is just have a look at the stroke size at the top here, which is one point and that is a little bit thick for us. So I’m just going to change that to about, let’s say 0.25 and it looks a little Better than now. So once you’re happy with the Align where we can go back into Rhino, and we can start adding some shadows. So I’m just going to go back into my top view here. I’m going to hide this linework here, and we want to move back into the parallel viewport.
As you can see, this is the one with the shadows on it the first things first, we’re going to change your background color, we’re going to hit the drop down here at the viewport settings, we’re going to go display options. From here, we can change the background viewport settings to be a solid color, we’re going to just make that white. And the rest of those settings are all good. And we’re just going to do a bit of a test render here. So we’re going to render toes and we’re gonna hit render and see what this looks like. co so this is how the shadow will look, once we put it underneath the line work in Adobe Illustrator. This could be a bit high quality. So what we can do is just get out of that and we can right click on that render button and that takes us to the Render Settings. We’re going to change the DPI to 300, actually, we’ll go to 600 because that gives us a high definition render. We’re going to change anti aliasing from Normal to high. And we’re actually going to change the background color to be white as well. Cool, and that’s what they do there. So that we’re just gonna hit render and let that render.
As you can see, this is a little bit higher quality when I zoom in as well, it looks a lot better. So all we have to do then is just save this image. I’m going to save it in the same spot as last time. And I’m going to find a spot to save it and chuck it in there. But to save it as a JPEG will head back to illustrate it and we’re going to add that image to our Illustrator file. Cool. So now that we’ve got that on there, we can bring up the layer panel. So to change the layout of my workflow from automation to essential so I’ve got the Layers panel here, and we’re going to make sure that we add any layer before we add that other one. So I’m just going to drag that one back in after I create a new layer. Kind of scale this up a little bit And then I’m just going to put this nice shadow file underneath the linework with God so that it shows underneath it. So what we want to do next is try and line up this shadow work with the linework. And so we can do that by just dragging it out, making it bigger, and then trying to line it up inside of the other pieces of it linework. So I’m just going to fast forward through here and try and get these two lineup. Go.
I think that looks pretty good. I hope you can agree with me, but they look pretty neat. Obviously, that could be a little bit bigger, but I’m not gonna be a perfectionist here. I think those shadows look pretty good inside the line work. They’re also now that we’ve done that with one this one’s up, we can start to line these forms up into a row and make them look like an operation diagram. So to do that, we’re going to first copy this background shadows image. We’re going to just come trail copy, and then we’re going to actually paste it in place by pressing Shift Control V, we’re going to do that 123456 times. So I’m going to go 123456 now got six of these background images. And what we can do is press the rectangle tool, and it’s create a clipping mask using the rectangle tool around the Shadow Work. So we’re just going to create a rectangle with that rectangle tool, we’re going to also use the selection tool and hold Shift to select the background shadows. From there, we can go to the Object menu bar, go down to clipping mask and press make or we can press Control seven to do that same process. What that allows us to do is to move just that shadow work rather than moving the entire thing goes. I’m just gonna run through that one. Again, we’re gonna have to do this for every single one of these forms. We’re going to have to create a rectangle, create a rectangle around the shadow and the form and then we’re going to go select that one and the background image by holding Shift and pressing the back We’re going to go to Object, we’re going to go Clipping Mask make. And we’re going to do that for every single one of these forms. So I’ll get back to you. After I finished that.
I’ve now created a clipping mask for each one of those forms. So what I can do is highlight them, and then just drag them into place. I’m going to line them all up next to each other. And as you can see, I didn’t create a white background for the render when I rendered it in Rhino, that’s like a light gray instead of a white, you might have saved me make that mistake, but I’m not going to be too fussed about it for this video. So we’re just going to line them up into play so that they are all in order. As you can see that starting to look pretty cool. We’ve got these forms that make up this operational diagram. So now you might be thinking, what can you do from here? We’ve got these forms that are lined up in this kind of diagram bit, but there’s not really Much context to it.
From this point, what you can do is start to annotate it and write on it. And, you know, we can say this part here it has been squished or, or rotate. And this bit here has been twisted and, and brought up and scaled up. And so to annotate it, what we can do is put some writing underneath here and say this form here has been rotated. And this form here has been scaled up in one day direction. This form here has had a void taken out of it. But so what I’m saying is we can start to annotate over it. And you can do this in Illustrator really easily I don’t really like Illustrator. So I’m going to move to Photoshop. So I’m just going to copy these forms. I’ve got a blank a4 document here, and I’m just gonna paste them in. I’m also going to scale them up a little bit. And from here I can easily remove these backgrounds as well. I’m just going to select all of the backgrounds there rasterize that I’m going to delete them so now that our backgrounds gone, you won’t have to do that. If you create Just background color Rhino to be white, as I was saying earlier, you can add this annotation over the top of it now I’m in Photoshop, it’s gonna be a bit easier for me, if you prefer to use illustrator by all means do that. So I’m just gonna add here, I’m going to use a type two and just type skew. And I’m just going to rotate that to be the same as the same angle as the isometric lines there. So let’s go ski. They’re gonna just copy that one over. And here we’re going to write scale code. I’m gonna copy that one over again and I’m gonna write void. I’m gonna kind of do that two more times. Thank you get the point with and Let’s go offset. And so you obviously want these to line up as well make it look really neat. You can do this however you like. But I’m just showing you an example.
Okay, so now that we’ll get those annotations in, we can start to add arrows or we can start to add colors. Or we could really the choices from here at endless you can do whatever you want to finish this diagram. For me, I’m going to add some arrows, I think, maybe add a little bit of color. And I’ll show you what the end result is. But yeah, really, please experiment with this and kind of try out some different things and see what works for you and what works for the concept and form development.
I just want to say thank you guys so much for watching this video. If you did enjoy it, or you found it helpful in whatever ways. please consider subscribing and liking the video. It really does help me if you haven’t already picked up the successful students checklist. It’s a checklist that you can go through every night to help you succeed. It is on our website at successfularchistudent.com you’ll find it on the front page there is also in the description. Thank you guys so much and I’ll see in the next video. Take care.